-

-
Location:
1922 Mentor Ave, Painesville Twp.
Location:
1922 Mentor Ave, Painesville Twp.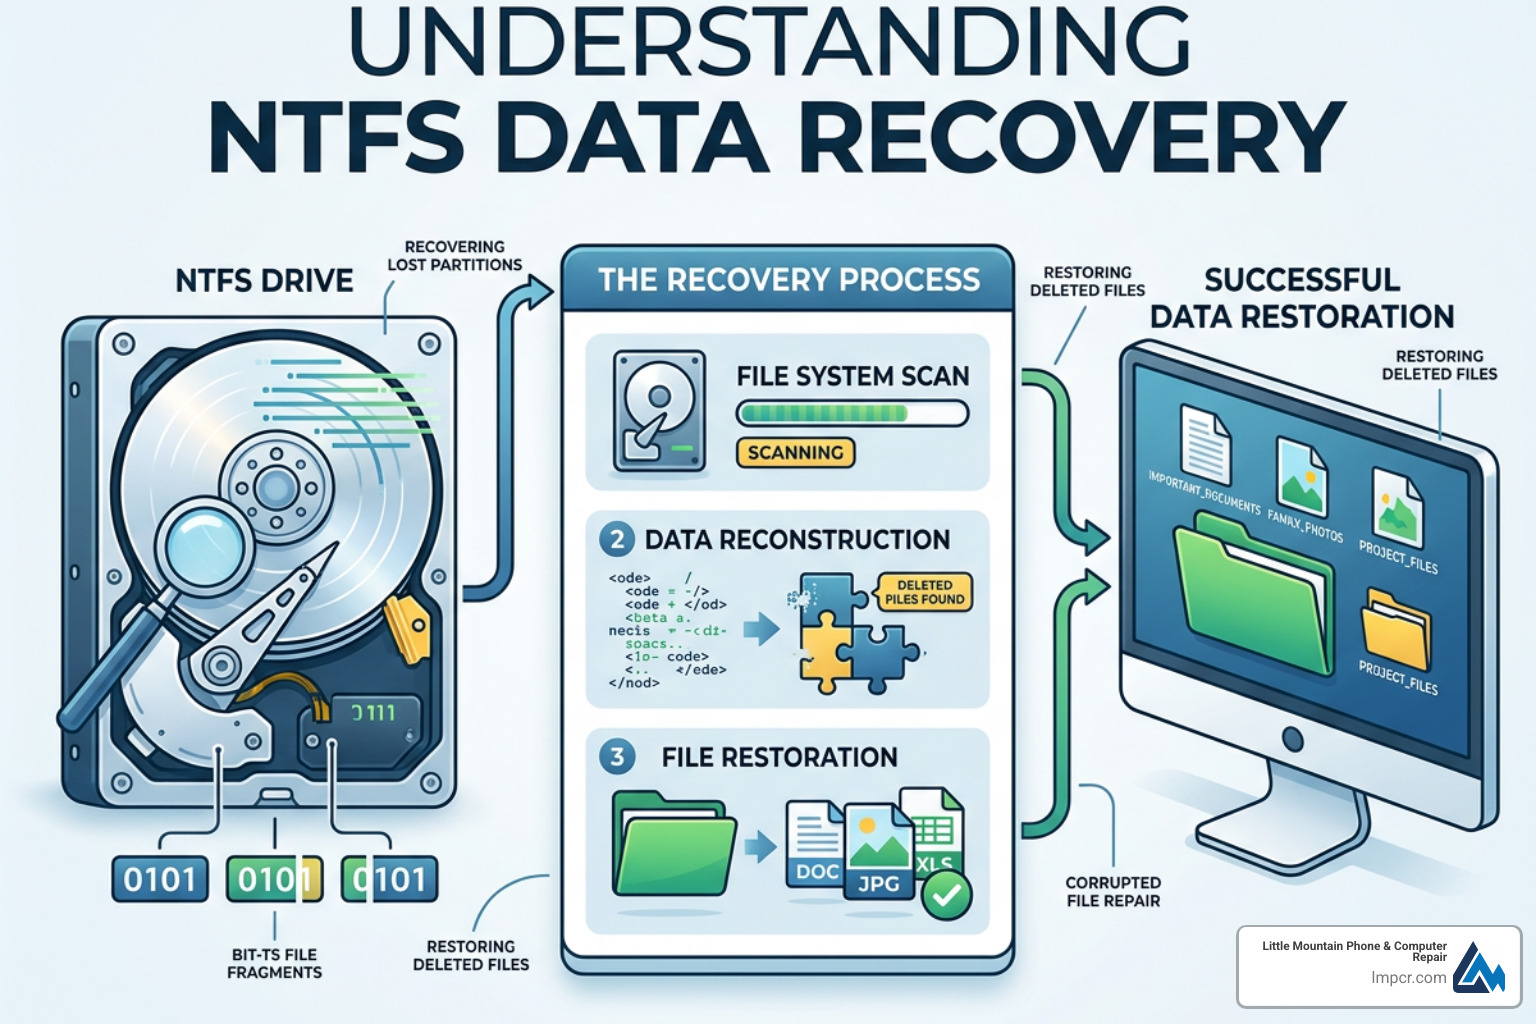
NTFS data recovery is the process of getting back lost, deleted, or inaccessible files from a Windows NTFS-formatted drive — and in most cases, it is possible.
Here’s a quick summary of what you need to know:
| Situation | Recovery Likely? | Best First Step |
|---|---|---|
| Accidentally deleted files | Yes | Stop using the drive immediately |
| Deleted or lost partition | Yes | Use TestDisk to scan for lost partitions |
| Formatted NTFS drive | Often yes | Use recovery software with MFT reconstruction |
| Overwritten data | Unlikely | Consult a professional |
| Physical drive damage | Depends | Seek professional data recovery |
The key reason recovery is possible at all comes down to how NTFS handles deletions. When you delete a file, Windows doesn’t actually erase the data right away. It simply marks the space as available in the file system’s index — called the Master File Table (MFT) — and moves on. The actual data stays on the drive until something new overwrites it.
That single fact is what makes NTFS data recovery work. But it also means every second counts. The more you use a drive after data loss, the lower your chances of getting files back.
One user on AskUbuntu described accidentally wiping a 255 GB NTFS partition and recovering it successfully — a question that has since been viewed over 122,000 times, which tells you just how common this problem really is.
I’m Jay Baruffa, President of Little Mountain Phone & Computer Repair in Painesville, Ohio, and I’ve helped countless local residents and businesses work through NTFS data recovery scenarios — from accidentally deleted partitions to drives that Windows simply refuses to open. This guide walks you through exactly what works, in plain language.

Explore more about ntfs data recovery:
To understand why we can get your data back, we have to look under the hood of the New Technology File System (NTFS). Despite the name being over twenty years old, it is a remarkably robust system. When you “delete” a file, NTFS doesn’t go through the digital equivalent of a paper shredder. Instead, it performs a clerical change in the Master File Table (MFT).
Think of the MFT as a massive spreadsheet where every row is a file. When you delete a file, NTFS just changes a tiny “flag” in that row from “In Use” to “Available.” It also updates a cluster bitmap, which is essentially a map of the drive’s physical storage blocks, telling the system it’s now okay to write new information over those specific spots.
As long as you haven’t saved a new 4K movie or installed a large game over those blocks, the original data—your photos, tax returns, or work projects—is still sitting there. However, if those blocks are overwritten, the data is gone for good. This is why we always tell our neighbors in Mentor and Willoughby: Stop using the drive immediately. Even browsing the web can create temporary files that might overwrite your lost data.
More info about data protection
The MFT is the heart of ntfs data recovery. Every file on an NTFS volume has at least one record in the MFT. These records contain “metadata”—the file name, size, timestamps, and security permissions.
If a file is small enough (usually under 900 bytes), it is “resident,” meaning the entire file is actually stored right inside the MFT record. For larger files, the MFT contains “data runs,” which are pointers to where the actual data lives on the disk. When we perform a recovery, we use tools to scan these MFT records, find the ones marked as deleted, and follow those pointers to rebuild the file.
More info about desktop recovery
At Little Mountain Phone & Computer Repair, we’ve seen it all. While “I accidentally hit delete” is the most common reason, there are several technical gremlins that can cause NTFS issues:
If your entire D: drive has vanished, don’t panic. TestDisk is a powerful, open-source tool that can often restore the entire partition in minutes. It works by scanning the drive for “backup” boot sectors that NTFS wisely hides at the end of the volume.

If you’ve accidentally deleted a partition, follow this general logic (and check the Step-by-step TestDisk guide for detailed visuals):
| Feature | TestDisk | PhotoRec |
|---|---|---|
| Primary Goal | Fix partition tables / boot sectors | Recover individual files |
| File System Support | NTFS, FAT, EXT, etc. | Almost any (over 480 file types) |
| Method | Repairs the file system index | Scans for “file signatures” (carving) |
| Best For | Whole drive “disappearance” | Formatted drives or corrupted MFT |
More info about saving your digital soul
Sometimes the partition is there, but the “door” is locked. This usually happens when the Master Boot Record (MBR) or the Boot Sector is damaged. A classic sign is a black screen with an error like “Operating System not found” or “Non-System Disk Error.”
Every valid MBR ends with a specific hexadecimal signature: 0x55AA. If a virus or a bad write operation wipes those two bytes, your computer won’t boot. Standard Windows tools like FIXMBR and FIXBOOT (run from a Recovery Console) can often rewrite these critical sectors. For NTFS, there is a duplicate boot sector; if the primary one is zeroed out, we can use the duplicate to restore access.
What if you didn’t just delete a file, but you accidentally formatted the whole drive? Or worse, the partition table is so scrambled that TestDisk can’t find anything? This is where we move into “RAW recovery.”
A “Quick Format” in Windows creates a new, blank MFT, but it doesn’t touch the data clusters themselves. To recover this, we use software that can perform MFT reconstruction. Tools like EaseUS Data Recovery or DiskInternals NTFS Recovery scan the entire disk for “orphaned” MFT records. By finding these records, the software can rebuild the original folder structure and file names.
More info about Linux file resurrection
When the file system index is completely gone, we use a technique called file carving or RAW recovery. This method ignores the MFT entirely. Instead, it looks for “file signatures”—unique patterns of bytes that identify a file. For example, every JPEG starts with the bytes FF D8 FF.
If you are a Linux user or comfortable with a Live CD, Ubuntu Rescue Remix is a fantastic resource. It includes ddrescue, which can create a bit-by-bit image of a failing drive, and PhotoRec for carving files out of the wreckage. GeekyProjects provides excellent insights into how RAW recovery can locate files even without a filesystem.
There are hundreds of tools out there, ranging from free open-source utilities to professional-grade software.
| Tool | Type | Best For |
|---|---|---|
| ntfsundelete | Free (Linux) | Quick command-line recovery of deleted files |
| Recuva | Free (Windows) | Casual users who deleted a file from the Recycle Bin |
| GetDataBack Pro | Commercial | Heavy-duty recovery; handles huge drives and complex corruption |
| DiskInternals | Commercial | Fully automated recovery with MFT reconstruction |
Free tools like TestDisk and PhotoRec are incredibly powerful but have a steep learning curve. If you aren’t comfortable with a command-line interface, you might find them intimidating.
Commercial tools like GetDataBack Pro offer a more “one-click” experience. They often use multiple “sophistication levels” to scan the drive. For example, if a quick scan doesn’t work, the software automatically escalates to a deeper scan. They are also usually native 64-bit applications, which is vital when you’re trying to recover data from a massive 12TB or 18TB hard drive.
More info about finding recovery services
While DIY software is great, it has its limits. You should stop and call a professional if you encounter:
Generally, no. Once a specific sector on a hard drive is overwritten with new data, the old data is gone. While there are forensic myths about “microscopy” recovery of overwritten data, in the real world, if you saved a new file over an old one, the old one is unrecoverable.
Be careful. Some users have reported that using certain Windows-based recovery tools on a Linux system (or a drive with Linux partitions) can actually damage the data further. If you are in a dual-boot environment, using Linux-native tools like ntfsundelete or ntfs-3g is often safer because they are designed to handle the nuances of how Linux interacts with NTFS.
More info about Android recovery
It depends entirely on the size of the drive and the nature of the damage. A simple “undelete” of a small file takes seconds. A “Deeper Search” on a 500 GB drive can take several hours, and a full file-carving scan on a multi-terabyte drive can literally take weeks. At Little Mountain Phone & Computer Repair, we leverage our 20+ years of experience to use the most efficient tools possible, often getting results much faster than home setups.
Losing data is stressful, but with the right approach, ntfs data recovery is often a success story. Whether it’s a simple accidental deletion or a corrupted partition table, the data is likely still there—waiting for you to find it.
The best defense, of course, is a good offense. Regular backups to the cloud or an external drive can save you from ever needing this guide. But if the worst happens and you’re in Lake County—whether it’s Painesville, Mentor, or Chardon—remember that you don’t have to do this alone.
At Little Mountain Phone & Computer Repair, we have over two decades of experience handling the most stubborn data loss cases. We pride ourselves on our quick 30-minute average repair times for standard issues and our comprehensive approach to data safety.

Need Help?
© Big Hill Technologies, LLC. All Rights Reserved