-
April 29, 2026
-
No Comments
The Samsung Galaxy A52 5G Screen Repair Handbook
The Samsung Galaxy A52 5G Screen Repair Handbook
Why Your Samsung Galaxy A52 5G Screen Deserves Expert Attention
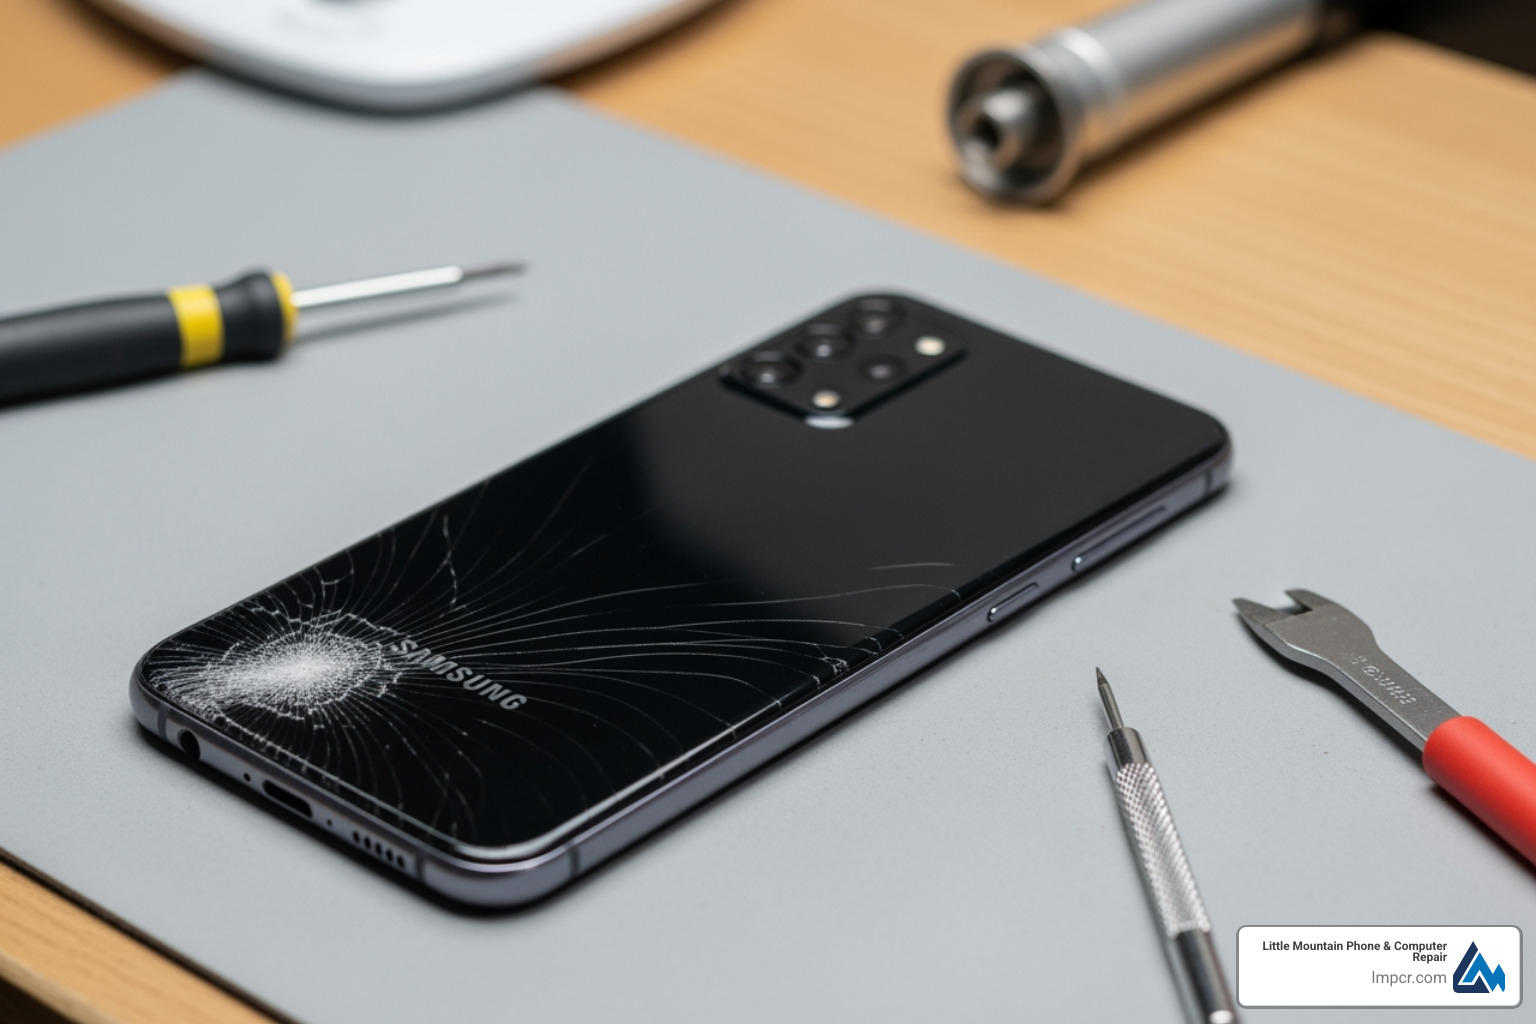
A52 5G screen replacement is a delicate repair that requires the right tools, parts, and technique to restore your phone’s display without compromising water resistance or functionality. Whether you’re dealing with a shattered screen, unresponsive touch, or display flickering, understanding the process helps you decide between DIY repair and professional service.
Quick Overview: A52 5G Screen Replacement
- Time Required: 1-2 hours for DIY; under 1 hour with professional service
- Difficulty Level: Moderate to advanced (requires heat application and careful adhesive work)
- Essential Tools: iOpener or heat gun, opening picks, suction handle, Phillips #00 screwdriver, spudger
- Key Steps: Remove back cover → Disconnect battery → Remove old screen → Install new screen → Reassemble
- Cost Range: $79-$135 for parts only; $135+ for professional service with warranty
- Important Warning: Discharge battery below 25% before starting to prevent fire risk
The most challenging aspects of this repair are managing the adhesive without damaging internal components and ensuring proper reconnection of the display flex cable. Many DIYers struggle with the initial screen separation, as the suction cup often gives way before creating an adequate gap. Additionally, water protection is lost if you don’t replace the adhesive seals during reassembly.
I’m Jay Baruffa, President of Little Mountain Phone & Computer Repair, and I’ve guided countless customers through device repairs, including a52 5g screen replacement decisions that balance cost, time, and quality. Whether you’re considering a DIY approach or professional service, this handbook will walk you through everything you need to know to make the right choice for your situation.
 Gather tools (heat source, picks, screwdriver, spudger, replacement screen), 2) Discharge battery below 25%, 3) Heat and remove back cover, 4) Remove motherboard cover and disconnect battery, 5) Disconnect screen cable, 6) Heat and remove damaged screen, 7) Clean frame with isopropyl alcohol, 8) Apply new adhesive, 9) Install replacement screen, 10) Reconnect cables and test display, 11) Reassemble device - a52 5g screen replacement infographic")
Identifying Symptoms and Preparing for a52 5g screen replacement
Before we dive into the nitty-gritty of an a52 5g screen replacement, let’s first confirm that your phone truly needs a new screen. Sometimes, what looks like a major issue might just be a loose connection or a software glitch. However, based on our 20+ years of experience in Smartphone Repair for devices like the Samsung Galaxy line, these are the most common symptoms indicating a damaged screen:
- Display Failure: This is the most obvious sign. If your screen is completely black, shows strange colors, or has permanent lines or patches, it’s likely a goner.
- Black Spots: Dark, ink-like spots appearing on the display, often spreading over time. This indicates damage to the OLED panel itself.
- Flickering: The display rapidly turns on and off, or shows intermittent distortion. This could be a damaged flex cable or a failing display panel.
- Touch Issues: Even if the display looks fine, touch problems can be incredibly frustrating.
- Unresponsive Touch: Parts of the screen, or the entire screen, no longer respond to your touch. This makes navigating your phone nearly impossible.
- Ghost Touches: The screen registers touches that aren’t happening, leading to apps opening randomly or typing errors. This can be caused by physical damage or internal component issues.
- Visible Cracks or Shattering: From hairline fractures to spiderweb cracks, physical damage compromises the display’s integrity and can lead to the symptoms above. Even small cracks can eventually allow dust or moisture to enter, causing further internal damage.
If you’re experiencing any of these, it’s time to consider an a52 5g screen replacement. But before you pick up any tools, there’s a crucial preparation step: battery safety.
Discharge the battery below 25% before starting any disassembly. Why, you ask? Because lithium-ion batteries can be quite temperamental. If accidentally punctured or damaged during the repair, a fully charged battery poses a much higher risk of fire or even explosion. A low charge significantly reduces this risk, making your repair experience safer. Trust us, it’s a small step that makes a big difference!
Starting on a DIY a52 5g screen replacement requires more than just courage; it demands the right arsenal of tools and the correct replacement part. Having these ready before you start will save you a lot of headaches (and potentially prevent further damage to your phone).
Here’s what you’ll typically need:
- iOpener or Heat Gun/Hair Dryer: This is your best friend for softening the adhesive that holds the back cover and screen in place. An iOpener provides controlled heat, while a heat gun or even a hair dryer can work, but require more caution to avoid overheating.
- Suction Handle: Essential for creating a gap between the back cover or screen and the phone’s frame. If your screen is badly cracked, covering it with clear packing tape can help the suction handle adhere.
- Opening Picks (Plastic): These thin, plastic tools are used to slice through the adhesive once a gap is created. They are gentler than metal tools and less likely to scratch or damage internal components.
- Spudger (Plastic or Metal): A versatile tool for prying, disconnecting cables, and manipulating small components without causing shorts or damage.
- Phillips #00 Screwdriver: The Samsung A52 5G uses tiny Phillips head screws, so a precision screwdriver set with a #00 bit is a must.
- Tweezers: For handling small screws, flex cables, and other delicate components.
- Isopropyl Alcohol (>90%): Crucial for cleaning off old adhesive residue and prepping surfaces for new adhesive. Always use high-concentration isopropyl alcohol for electronics.
- New Adhesive Seals: If you want to retain any semblance of water resistance, new adhesive for the back cover and screen is non-negotiable.
- Replacement Screen: This is the star of the show! Ensure you get the correct model for your Samsung Galaxy A52 5G (models like A526B, A526B/DS, A526W, A526U). Be wary of screens designed for the A52 4G (A525), as they are not compatible. Many replacement screens come with the repair tools included, which can be a convenient bonus.
Where to Buy a Replacement Screen for the Samsung A52 5G
You can find replacement screens from various online retailers. Websites like Amazon are popular choices for their wide selection. For example, you might find a screen like this: Screen Replacement for Samsung Galaxy A52 5G Incell, A526B A526B/DS A526W A526U LCD Display Touch Digitizer Assembly with Repair Part Tools(Black with Frame,Without Fingerprint,Not for A52 4G/A525) : Cell Phones & Accessories .
When purchasing, pay close attention to the screen type. The original Samsung Galaxy A52 5G comes with a Super AMOLED display, known for its vibrant colors and deep blacks. Many aftermarket replacements are “Incell LCD” screens. While more affordable, they typically offer different visual characteristics.
Here’s a quick comparison:
| Feature |
Original AMOLED Display |
Aftermarket Incell LCD Display |
| Display Quality |
Vibrant colors, deep blacks, high contrast |
Good colors, but typically less vibrant, shallower blacks |
| Brightness |
Generally brighter, better outdoor visibility |
Can be slightly dimmer than original |
| Power Consumption |
More power-efficient, especially with dark themes |
Generally consumes more power |
| Thickness |
Thinner, allowing for slimmer phone designs |
Slightly thicker, may affect fit slightly |
| Cost |
Higher |
Lower |
We always recommend sourcing the highest quality part you can afford, ideally an original service pack part, to ensure the best performance and longevity for your a52 5g screen replacement. If you’re unsure, our experts in Painesville, Mentor, and surrounding areas can help you find the right part or perform the replacement for you!
Step-by-Step Guide to the Repair Process
Alright, deep breaths! We’re about to dive into the heart of your Samsung Galaxy A52 5G. This process requires patience and precision. If you feel overwhelmed at any point, that’s perfectly normal. We’re always here to help with Cellphone Repair if you’re in the Lake County, Ohio area.
For a comprehensive visual guide, we highly recommend referencing resources like the Samsung Galaxy A52 Screen Replacement guide. We’ll outline the key steps here.

Removing the Old Display for a52 5g screen replacement
- Heat the Back Cover: Apply heat to the edges of the phone’s back cover for about two minutes. An iOpener or careful use of a heat gun/hair dryer will soften the adhesive. The goal is warm to the touch, not scorching hot!
- Create a Gap: Secure a suction handle to the bottom edge of the back cover. Gently pull up to create a small gap. If the back cover is damaged and the suction handle won’t stick, you can try lifting it with strong tape or even supergluing the suction handle in place (allow it to cure first!).
- Slice the Adhesive: Once a gap is formed, insert an opening pick and slide it around the perimeter of the back cover to cut through the adhesive. Be gentle around the camera module. Leave picks in place as you go to prevent the adhesive from resealing.
- Remove the Back Cover: Carefully lift and remove the back cover. Set it aside.
- Unscrew the Motherboard Cover: You’ll see a large plastic cover secured by screws over the motherboard. Use your Phillips #00 screwdriver to remove all the screws (typically around 10).
- Pry Up the Motherboard Cover: Use your spudger or an opening pick to carefully pry up and remove the motherboard cover. This will expose the internal components.
- Disconnect the Battery: This is critical! Locate the battery connector and use a plastic spudger to gently pry it straight up from its socket. This disconnects power and prevents accidental shorts during the rest of the repair.
- Disconnect the Interconnect Cable: There’s usually a flex cable connecting the motherboard to the charging board. Disconnect this cable using your spudger.
- Pry Up the Screen Connector: Locate the display flex cable connector on the motherboard. Gently pry it up and disconnect it.
- Heat the Screen: Now, turn your attention to the front of the phone. Apply heat to the edges of the screen, just like you did for the back cover. Focus on the adhesive beneath the screen.
- Create a Gap for the Screen: Attach your suction handle to the bottom edge of the screen. If the screen is severely cracked, covering it with clear packing tape can help the suction cup adhere. Alternatively, you might need to use very strong tape to pull up the screen.
- Slice the Screen Adhesive: Once a gap is created, insert an opening pick and carefully slide it around the entire perimeter of the screen to cut the adhesive. Be extra cautious near the top, where the front-facing camera and sensors are located. Only insert the tip of the pick (3-4 mm) here to avoid damage.
- Remove the Screen: Gently thread the display cable through the frame and carefully lift the old, damaged screen away from the phone. Congratulations, the hardest part is over!
Reassembling the Device After a52 5g screen replacement
Now for the fun part: putting it all back together with your shiny new screen!
- Clean the Frame: This step is often overlooked but is crucial for a successful repair and proper adhesion. Use isopropyl alcohol (>90%) and a lint-free cloth to carefully clean all old adhesive residue from the phone’s frame. Any bumps or debris can prevent the new screen from sitting flush, leading to future damage or poor touch response.
- Apply New Adhesive: If your new screen didn’t come with pre-applied adhesive, you’ll need to apply new double-sided adhesive strips specifically designed for phone repair around the inner perimeter of the frame. This is essential for securing the screen and, if done correctly, can help restore some water resistance.
- Test the New Display (Crucial Step!): Before permanently adhering the new screen, perform a quick test.
- Carefully connect the new display flex cable to its connector on the motherboard.
- Reconnect the battery.
- Power on the phone.
- Check for display functionality (is it turning on? are colors correct? are there dead pixels?).
- Test the touch screen thoroughly across the entire surface.
- If everything looks good, power off the phone and disconnect the battery again.
- Install the New Screen: Carefully position the new screen into the frame, ensuring the flex cable is properly threaded through its opening. Apply gentle, even pressure around the edges to help the new adhesive bond.
- Reconnect Components:
- Reconnect the display flex cable.
- Reconnect the interconnect cable.
- Reconnect the battery.
- Reinstall Motherboard Cover: Place the motherboard cover back into position and secure it with all the Phillips #00 screws.
- Apply New Back Cover Adhesive: Clean the old adhesive from the back cover and apply new adhesive strips around its perimeter.
- Reattach Back Cover: Carefully align the back cover and press it firmly onto the frame, ensuring it’s seated correctly. Apply gentle, even pressure for several minutes to allow the adhesive to bond.
- Final Testing: Power on your phone and perform a final, comprehensive test of the display and touch functionality.
Congratulations! You’ve just performed an a52 5g screen replacement. Give yourself a pat on the back – that’s no small feat!
Risks, Costs, and Professional Alternatives
Performing a DIY a52 5g screen replacement can be rewarding, but it’s not without its challenges and potential pitfalls. It’s important to weigh these factors, especially when considering the long-term health of your device.
How much does a Samsung A52 5G screen replacement cost?
The cost of an a52 5g screen replacement can vary significantly depending on whether you go the DIY route or opt for professional service.
- DIY Pricing: The replacement screen itself can range from approximately $79 for Incell LCD versions to around $135 for higher-quality AMOLED or original service pack parts. This doesn’t include the cost of tools, which you might already have or can purchase in a kit for an additional $10-$30. So, your total DIY cost could be anywhere from $90 to $165.
- Professional Labor: When you bring your phone to a reputable repair shop like Little Mountain Phone & Computer Repair, you’re paying for more than just the part. You’re investing in:
- Expertise: Our technicians have 20+ years of experience and are trained to handle delicate phone repairs. We know the common pitfalls and how to avoid them.
- Quality Parts: We source high-quality replacement parts, often original service pack components, to ensure optimal performance and durability.
- Warranty: Most professional repairs come with a warranty on parts and labor, providing peace of mind.
- Efficiency: We pride ourselves on quick turnaround times, with many screen replacements completed in under an hour.
- No Risk to You: If something goes wrong during the repair, it’s on us, not you!
While specific pricing for professional a52 5g screen replacement can vary, expect it to be higher than just the part cost, typically starting from around $135 and going up depending on part quality and labor rates. However, for many in Painesville, Mentor, and throughout Lake County, Ohio, the convenience, speed, and assurance of a professional repair outweigh the DIY savings. We understand The Latest Trends in Cellphone Repairs You Need to Know and are equipped to handle your repair efficiently.
Will I lose water resistance after replacing the screen?
The Samsung Galaxy A52 5G originally boasts an IP67 rating for dust and water resistance, meaning it can withstand submersion in up to 1 meter of water for 30 minutes. However, performing a DIY a52 5g screen replacement will almost certainly compromise this water resistance.
The IP67 rating relies on precise factory seals and adhesives that are difficult to replicate perfectly outside of a controlled manufacturing environment.
- Adhesive Seals: When you open the phone to replace the screen, you break these seals. While you can apply new adhesive during reassembly, it’s very challenging to get the same level of airtight and watertight seal as the original factory application.
- Reassembly Tips: If you want to maximize your chances of retaining some splash resistance (we wouldn’t recommend submerging it again!), ensure you:
- Thoroughly clean all old adhesive residue.
- Use high-quality, pre-cut adhesive strips designed for the A52 5G.
- Apply firm, even pressure around the entire perimeter of the screen and back cover during reassembly.
Even with the best DIY efforts, assume your phone is no longer water-resistant after an a52 5g screen replacement. If water resistance is a critical feature for you, professional repair services might offer better (though still not guaranteed to factory-spec) re-sealing, but even then, caution is advised.
What should I do if the screen doesn’t turn on after repair?
So, you’ve completed your a52 5g screen replacement, reassembled everything, and… nothing. The screen is black, or it’s behaving strangely. Don’t panic! This is a common hiccup, and there are a few troubleshooting steps you can take:
- Check Flex Cables: The most frequent culprit is a loose or improperly seated flex cable.
- Power off the phone and disconnect the battery.
- Carefully open the phone back up (just enough to access the motherboard cover).
- Gently disconnect and then firmly reconnect the display flex cable and the interconnect cable. Ensure they “click” into place and are perfectly aligned.
- Reconnect the battery and test again.
- Battery Reset: Sometimes, simply disconnecting and reconnecting the battery can resolve minor power-related display issues. Ensure the battery connector is securely seated.
- Inspect for Damage: While the phone is open, carefully inspect the flex cables and connectors for any signs of tears, bends, or damage. Even a tiny crimp can prevent proper function. Also, check the motherboard connectors for any bent pins.
- Test Old Screen (if possible): If your old screen still displayed something (even if cracked), try reconnecting it (briefly!) to see if it powers on. If the old screen works but the new one doesn’t, it strongly suggests a faulty replacement screen.
- Check for Debris: Ensure there’s no tiny piece of debris or screw lodged somewhere it shouldn’t be, potentially shorting out a component.
- Re-apply Heat (for a stuck screen): If the screen feels loose or uneven, you might need to re-apply gentle heat to the edges and press firmly to ensure the adhesive bonds properly.
If none of these steps resolve the issue, you might have a defective replacement screen, or there could be more complex damage. At this point, it’s often best to seek professional help. Our team in Painesville, Ohio, and surrounding communities can diagnose the problem quickly and provide a reliable solution, saving you further frustration.
Conclusion
Successfully completing an a52 5g screen replacement can be a truly satisfying experience, giving your beloved device a new lease on life. We’ve walked through identifying the symptoms, gathering the right tools and parts, and navigating the intricate steps of disassembly and reassembly. Remember the crucial details: discharging the battery for safety, carefully cleaning surfaces, and testing your new display before final adhesion.
While the DIY route offers cost savings and a sense of accomplishment, it also carries risks, from potential loss of water resistance to accidental damage during the repair. If the thought of prying open your phone fills you with dread, or if you simply value your time and peace of mind, professional repair is an excellent alternative.
At Little Mountain Phone & Computer Repair, we specialize in comprehensive Services for all your tech needs, including expert Professional Cellphone Repair for devices like the Samsung Galaxy A52 5G. With over 20 years of experience and a commitment to quick, high-quality repairs, we’re here to help the communities of Painesville, Mentor, Chardon, and all of Lake County, Ohio. We can often complete an a52 5g screen replacement in under an hour, getting you back to your digital life without delay.
Finally, whether you choose DIY or professional repair, remember to responsibly dispose of your old screen and any other electronic waste. Look for R2 or e-Stewards certified recyclers in your area to ensure harmful materials are handled properly.
If you have any questions, or if your DIY repair didn’t go as planned, don’t hesitate to reach out. You can always Contact Us directly or visit one of our convenient locations. We’re always happy to lend our expertise!